Idea
A working master branch in a continuous integration environment is key for fast development. While we hack line after line into the project, we merge back to master branch often even while the feature branch is still in development.
Merging early and often helps to avoid merge conflict hell because otherwise feature branches move too far apart. But this comes at the risk of breaking the master branch build. If that happens, the developer in charge has to stop his ongoing task and fix stuff immediately.
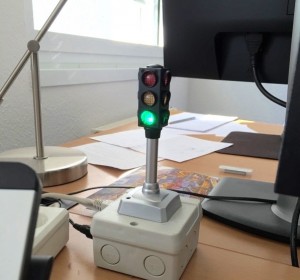
Until recently we used emails to notify the team of a failing build. But since email is old-fashioned, we hacked a signal light to show us the current build status. Follow the instructions below if you want to build your own Jenkins Traffic Light:
Prerequisites
Hardware Requirements
[table caption=“Things you’ll need“ colalign=“left|left|center|left“]
stuff,description,price
arduino, e.g.: uno rev 3. There are cheaper alternatives but some things may work differently, 20€
Ethernet Shield,, 33€
Toy traffic light, e.g. this one http://www.pearl.de/a-NC2046-4480.shtml does not require a separate power supply but the arduino digital pin output power, 4.90€
Soldering iron,I just assume you already got one. If not and you just gain first experiences I recommand one with adjustable heat,
Small screwdriver, You should really have a set of different sizes,
Some sort of case,,
Power supply,e.g. http://www.amazon.de/Aukru-Netzteil-Arduino-Platine-Neufassung/dp/B00PADO5CG/ref=sr_1_1?s=ce-de&ie=UTF8&qid=1432481528&sr=1-1&keywords=arduino+netzteil,8.99€
Cable stripper,A knife will do the trick too,
Bell wire,you get way more than you need for this project,1€
heat shrink tube & lighter, duct tape will work too,1€
drilling machine, knife could work too,
A Jenkins build job, that’s what this idea is all about right?, priceless
[/table]
Further requirements
- A working build infrastructure to execute code on the Arduino.
For hacking on my mac, I prefer a simple text editor with syntax highlighting like Sublime Text and the command line tool INO. But since there are lots of good tutorials on how to setup your build infrastructure, I’ll skip this step. For beginners it’s probably easiest to start with the official IDE.
- A basic knowledge of Arduino programs.
I don’t want to cover the basics here. There are tons of beginners guides out there that do that in much detail; Why not start with the official getting started guide.
Instructions
First aim: Toggle lights timer-based without any networking or consideration of Jenkins build status.

- Decompose the traffic light
- Dissolve cables from inside the traffic light off of the Platine.
- Connect the cables
- Connect red cable to the plus port of the Arduino.
- Connect green cable to digital pin 1 of the Arduino.
- Connect yellow cable to digital pin 2 of the Arduino.
- Connect white cable to digital pin 3 of the Arduino.
- Compile and upload the following script:
int PIN_GREEN_LED = 1;
int PIN_YELLOW_LED = 2;
int PIN_RED_LED = 3;

void setup()
{
pinMode(PIN_RED_LED, OUTPUT);
pinMode(PIN_GREEN_LED, OUTPUT);
pinMode(PIN_YELLOW_LED, OUTPUT);
}

void loop()
{
setSignalRed();
delay(1000);
setSignalGreen();
delay(1000);
setSignalYellow();
delay(1000);
}

void setSignalRed()
{
//HIGH=OFF
digitalWrite(PIN_GREEN_LED, HIGH);
digitalWrite(PIN_RED_LED, LOW);
digitalWrite(PIN_YELLOW_LED, HIGH);
}

void setSignalGreen()
{
digitalWrite(PIN_RED_LED, HIGH);
digitalWrite(PIN_GREEN_LED, LOW);
digitalWrite(PIN_YELLOW_LED, HIGH);
}

void setSignalYellow()
{
digitalWrite(PIN_RED_LED, HIGH);
digitalWrite(PIN_GREEN_LED, HIGH);
digitalWrite(PIN_YELLOW_LED, LOW);
}
After upload you should see the lights switching from red to green to yellow and back to red again.
If everything succeeded, congrats! 😀
If not, ping me on twitter or below in the comments section!
Next aim: Find out the right URL for your Jenkins project whose build status you want to observe.
For this we put the Arduino aside for a sec and try out the following URL in our preferred web server:
- Base Address of your Jenkins Server
http://YOUR-JENKINS-SERVER-URL - Address of project’s last build status
/job/YOUR-PROJECT-BUILD-JOB-NAME/lastBuild - Suffix to tell Jenkins to output JSON and only the interesting part of it.
/api/json?tree=result
In case it isn’t obvious, you have to replace YOUR-JENKINS-SERVER-URL with the URL pointing to your Jenkins server and YOUR-PROJECT-BUILD-JOB-NAME with the project’s name configured in Jenkins. The remaining parts can stay the same. Put the parts together and try it out on your desktop machine or laptop. If it doesn’t work from there, it won’t work for Arduino neither.
You should see something like this:
{"result":"SUCCESS"}
So make sure this works before you proceed.
The last mile: Packaging all together.

- Drill a hole through the top of the casing.
- Glue the signal light to the top of the casing
Make sure the cables peek through the hole. - Extend the cables
Otherwise it will get hard to put everything together. - Use heat shrink tube or duct tape to cover the soldering joints.
- Install the network shield
- Stack the network shield on top of the Arduino.
- You’ll have to use the digital ports on the network shield now.
- Make sure to use the same port numbers as before.
- Prepare the bottom part of the casing
As the Arduino will go in there and the casing will get closed, drill holes into the side of the casing for power supply and the network cable.
Put the Arduino into the casing to check if the holes are at the right position. - Connect the wires
Connect the wires as before.
To spare you some scrolling:
Connect red cable to the plus port of the Arduino.
Connect green cable to digital pin 1 of the Arduino.
Connect yellow cable to digital pin 2 of the Arduino.
Connect white cable to digital pin 3 of the Arduino. - Adapt, compile and upload the following script:
#include <SPI.h>
#include <Ethernet.h>
// Enter a MAC address for your controller below.
byte mac[] = {  0x00, 0xAA, 0xBB, 0xCC, 0xDE, 0x02 };
char serverName[] = "YOUR-JENKINS-SERVER-URL";

String readString = String(100);
EthernetClient client;

int PIN_RED_LED = 2;
int PIN_GREEN_LED = 1;
int PIN_YELLOW_LED = 3;
int REQUEST_DELAY_IN_MICROSECONDS = 1000 * 10;

void setup() {
   // give the Ethernet shield a second to initialize:
   delay(1000);

   configurePINs();
   setSignalYellow();
   if (!initializeEthernet())
   {
      // Failed to configure ethernet.
      // Prevent entering main loop by never leaving setup procedure
      while(true)
      {
         setAllSignalsOff();
         delay(1000);
         setSignalRed();
         delay(1000);
      }
   }
}

bool initializeEthernet()
{
   return (Ethernet.begin(mac) != 0);
}

void configurePINs()
{
   pinMode(PIN_GREEN_LED, OUTPUT);
   pinMode(PIN_RED_LED, OUTPUT);
   pinMode(PIN_YELLOW_LED, OUTPUT);
}

void loop()
{
 // if there are incoming bytes available
 // from the server, read them and print them:
   String url = "BUILD-JOB-JSON-OUTPUT-RELATIVE-PATH";

   while(connectToURL(url) == false)
   {
      delay(REQUEST_DELAY_IN_MICROSECONDS);
   }

   if (client.available()) {
      char c = client.read();
      readString.concat(c);
      // Serial.print(c);
   }

   // if the server's disconnected, stop the client:
   if (!client.connected()) {
      // connected to server, read in Jenkins's output
      bool isSuccessful = readString.indexOf("SUCCESS") > -1;
      readString.remove(0);
      if (isSuccessful)
      {
         setSignalGreen();
      } else
      {
         setSignalRed();
      }

      client.stop();
      delay(REQUEST_DELAY_IN_MICROSECONDS);
   }
}

bool connectToURL(String url)
{
   if (client.connected())
   {
      return true;
   }

   if (client.connect(serverName, 8080)) {
      // connected to server, make HTTP request
      String request = "GET ";
      request.concat(url);
      request.concat(" HTTP/1.0");
      client.println(request);
      client.println();
      return true;
   }
   else {
      // no connection to server
      return false;
   }
}

void setSignalYellow()
{
   digitalWrite(PIN_GREEN_LED, HIGH);
   digitalWrite(PIN_YELLOW_LED, LOW);
   digitalWrite(PIN_RED_LED, HIGH);
}

void setSignalRed()
{
   digitalWrite(PIN_GREEN_LED, HIGH);
   digitalWrite(PIN_YELLOW_LED, HIGH);
   digitalWrite(PIN_RED_LED, LOW);
}

void setSignalGreen()
{
   digitalWrite(PIN_RED_LED, HIGH);
   digitalWrite(PIN_YELLOW_LED, HIGH);
   digitalWrite(PIN_GREEN_LED, LOW);
}

void setAllSignalsOff()
{
   digitalWrite(PIN_RED_LED, HIGH);
   digitalWrite(PIN_YELLOW_LED, HIGH);
   digitalWrite(PIN_GREEN_LED, HIGH);
}
From the build status URL you found out in the previous step, replace YOUR-JENKINS-SERVER-URL with the base address and BUILD-JOB-JSON-OUTPUT-RELATIVE-PATH with the remaining part.
Plug in the network cable and test the output. If everything works, you should see the green light for successful builds and the red for unsuccessful ones.
If it does not work, there could be several reasons
- Arduino does not have a working ethernet connection
- Jenkins Server not reachable (from same network as Arduino is on)
- There’s no build job yet
- Typos in the URLs of the Arduino script
Please check the above.
This script is working fine for me, but there might be other circumstances under which it isn’t.
Have fun with your new Jenkins traffic light 🙂